Monday, September 22, 2014

Organize and Display Your Pride and Joy

Anyone who knows me well, knows I have tons of funky jewelry. From long beads, to second hand store finds, to sterling silver...I have a slight obsession with necklaces. And earrings. And rings. And bracelets.

I've come to amass so much it's been really hard keeping it organized. Kind of like a closet. If you cant see everything, you don't know what you have. I'd spend forever digging through my jewelry and get so excited to find something I bought a million years ago and haven't worn since because it got lost amongst all the beads and pendants.

There's tons of jewelry organizers. I feel like I've tried them all. I've got a super cool genuine Japanese musical jewelry box, but I save that for the good stuff. I bought one of those tree thingys but my necklaces are sooooo long and thick, I have to wrap them around a million times then they get tangled on the tree.  I ended up with a high tangled mess anyways...


                                                   Before                                                       After


After looking through hundreds of pins on pinterest, I decided to come up with my own idea. It's super easy, takes about ten minutes and cost about ten bucks!

Over the summer, I got into making painted signs using old pieces of wood I found. I had a bunch of skinny scraps that were nicely weathered. I went to a Habitat Restore place right around the corner and found some cool old knobs. I'm sure you can find some at flea markets.

I played around with the placement of them and drilled some holes, evenly spaced apart. I didn't measure. I'm a pro at eyeballing things.

I screwed in the knobs, used a piece of wire strung around the back of the screws and I was done!

 I also found little hooks that act just like push pins.


It hangs proudly in my bathroom and looks pretty cool!


I ended up making two of these, just because I needed more room!


In addition to my obsession with necklaces, I love earrings. I did finally find the cutest little birdcage earring holder for a dollar at a flea market but still struggled with my studs. I kept them in a small bowl.  Again not being able to find a match. Ever.


So I came up with another easy inexpensive idea to hold my lil studs....


Cork boards! I found a pack of 4 skinny ones at Jo Ann Fabrics for about $4. Since my studs were a bit longer than the cork was thick, I just doubled it up. It came with its own double sided sticky foam to! All I had to do was push my earring through, peel off the sticky foam and hang it! Now I don't have to spend forever trying to find a matching pair. And I can see them all at once.


You're Welcome.

Tuesday, August 19, 2014

A Berry Delicious Pie

I forgot how much I love pie. The only time I eat and sometimes even make it is at which happens to be my all time favorite holiday. I also forgot how much I love making pies. Most people probably buy the pre made frozen pie crust but don't realize how much better a homemade one is. Yes, it can be a bit of a pain in the ass and is an extra step but how impressive is it to be able to present a perfectly crimped pie crust that tastes even better than it looks.
Thanksgiving...

I got my pie baking skills...sorry in advance mom...from cooking class in high school. My teacher was a bit of a Martha Stewart meets Hitler.  We had to do over our crusts til we got it right. Luckily it didn't take me too long and I became pretty good at it...until I met my husband. He's a bit of a perfectionist and he would definitely beat out my pie primping skills, after a few tedious hours of getting it just right. :)

So I had all these berries...some were fresh, some were frozen. I was supposed to make jelly but just never got around to it, plus my Noni keeps giving me hers so why make my own!  I've been thinking about pie since the summer. Everyday I would pass a Sixpence Pie Company and never got the chance to go in. Got some good berries from the grocery store on sale, so those mixed with the ones I froze a few weeks earlier will be my quadruple berry pie...strawberries, blueberries, blackberries and raspberries. I just love berries, especially since I'm allergic to mostly every other fruit that has skin.

This is a super easy recipe so taking the extra step to make the pie crust is definitely doable. And it only takes 4 ingredients and a little bit of elbow grease.


Four Berry Pie

Makes one 9 inch lattice top pie

Pie crust:
  • 2 1/3 cups all purpose unbleached flour
  • 1 1/2 sticks of butter, salted
  • 2 tsp sugar
  • 8-10 teaspoons ice water 
Combine your flour and sugar in a bowl. Cut up your sticks of butter into smaller chunks. They should be almost right out of the fridge, not softened!


Using a pastry cutter, "cut" your butter into the flour until it is broken down into pea sized bits. The mixture should be crumbly. If you don't have a pastry cutter, you can also use a fork or even your food processor. I like to get my hands directly in the dough so I can feel how big the chunks of butter are...not too big, not too small. This is the most important part in making a light and flaky pie crust!


When you have your desired consistency, slowly add a few teaspoons of water at a time and incorporate into your flour. As soon as the dough begins to stick together, dump it out on a large wooden board and form your balls!


I separated mine into two, one larger for the crust and one smaller for the lattice top. Secure in saran wrap and refrigerate for about 20 minutes while you prep the filling.


Filling:
  • 5 cups berries...I think I used about 2 cups of strawberries, 1 1/2 cups blueberries and maybe 3/4 cup each of raspberries and blackberries. I'm terrible with measuring but amazing when it comes to "eyeing it."
  • 1/2 cup flour... I altered this from the original recipe in my trusty ole Betty Crocker cookbook since I used more strawberries. They have a bit more moisture so I increased the flour.
  • 3/4 cup sugar
  • Sprinkle of cinnamon
  • Juice of half a lemon
Now throw all your ingredients in a bowl and combine. That's it!  Back to the pie dough...


Assembly:

Preheat your oven to 375 degrees.

When you're ready to put your pie together, place your dough on a lightly floured wooden board. Flour up your rolling pin. Roll out your dough, constantly rotating it to get a nice size circle. Your dough should be about 1/4 inch thick. Use your pie dish to help figure out if the circle is big enough.


 To transfer your dough to the pie dish, roll it up half way around your rolling pin. Carefully hover over your dish and unroll it. Although I love ceramic dishes since they're so pretty, I use a glass one because you can see through the bottom and check how done your pie is.


Gently push the edges into the bottom of the pie dish. Trim off excess leaving about 1/2 inch hanging over the edge of the dish. Save the scraps for later!

Fold and tuck it underneath to give it smooth edge. Then crimp away! One thumb should be on the inside part of the crust and your opposing thumb and pointer finger should be on the outside.  Gently push them towards each other making an indent in the dough, all the way around the pie. I tend to do it at a little bit of angle.


Use a fork to poke some holes in the bottom of your crust. This will allow any steam to escape and result in a cooked bottom instead of a soggy one.

Dump your filling in the crust and spread around evenly.

Roll out your second pie crust for the lattice top. I have a neat little cutter I use to make a nice edge but a pizza cutter works too! I cut mine about 1 inch thick.


Lay about 4 or 5 of them across the top of your pie. You want to weave the other ones in the opposite direction, alternating over/under.

Trim off the excess and fold and tuck the edges into the crust the best you can.

To get a nice golden top, you can brush it with milk or an egg wash. Sprinkle a little bit of cinnamon and sugar on top if you'd like and pop it in the oven with a pan underneath to catch drippings.


I leave the crust uncovered for the first twenty minutes, then wrap it in foil so it doesn't burn. I peak on it constantly and remove the foil towards the end of baking. I also bumped up the temp to 400 degrees after about 40 minutes. Baking times will vary but that's why it helps to have a glass bottom dish.  You want a light golden top.

Oh and those scraps from the pie crust! Sprinkle with some cinnamon and sugar and throw on a cookie sheet and bake too! Put them on ice cream or just eat as they are!


The only thing this pie is missing is whipped cream...

While it's baking, whip up some fresh whipped cream. I use my hand held immersion blender or my kitchen aid...about a cup of heavy cream and a cup or so of powdered sugar with a squirt of vanilla.


You're Welcome.

Monday, August 11, 2014

The Perfect Pizza

I can't tell you how many times I cooked pizza before I finally found the best way to make it...on the grill.  We don't make it any other way. The grill is the only way and it comes out amazing and done in less than ten minutes. I do have to warn you that it is not easy and might take a few tries to get it down perfectly. We've been grilling pizza for a few years now but still screw it up every once in a while...mostly due to my lack of patience for waiting for the dough to rise. 


I usually start with making my own dough. My husband scolded me one time we messed up the pizza blaming it one the store bought dough.  Homemade dough just tastes better and has a little bit more elasticity...that is if you let it rise completely.

Pizza Dough Recipe 

Makes 1 large pizza about 14" or two 8" pizzas

Combine about 2 1/2 cups of flour, a tablespoon of sugar, sprinkle of salt and a teaspoon of garlic powder in a bowl. I say approximate measurements especially with the flour because you'll be using more when you go to stretch it out.

**Super important next step... get one cup of water to a temperature of 120 degrees.  You definitely need a thermometer for this. If it's too hot the yeast will die and result in your dough not rising at all. If it's not hot enough, the yeast won't activate and make your dough nice and stretchy either.  Once you have the perfect temp, dump in your yeast and whisk until it's dissolved.

I drizzle a tablespoon or two of oil olive into the yeast water. Pour that into your flour mixture and dig in. Hands are the best tools for this. When everything is incorporated, dump your dough out and knead for at least 8 minutes...another super important step! I'm so used to baking where you combine ingredients until they are just mixed so for a while I wasn't kneading enough. My dough would come out flat, dense and chewy.

Not the waiting begins. Even if you buy dough at the store, you still have to wait.  I make my dough first thing in the morning and leave it out on the counter, oiled up, always tightly covered and under a towel all day. Or if it's a sunny day, I put it outside.  It should take a few hours. The perfect temperature for dough to rise is 82 degrees.  The dough should just about double in size by the time it's ready.

Here's a good link to describe and show how to properly stretch your dough...

Some tips for stretching dough:
  • Don't play with it too much. If you overwork your dough, it'll pretty much get tired and not wanna work anymore
  • If you're using a wooden board, place a moist towel underneath it so it doesn't slide all around.
  • Use enough flour so it's not sticky but not too much so it dries it out.
  • Try to make it even thickness, about 1/2 inch.
  • Small holes can be fixed with a little pinching


Fire up the grill...

While you wait for your grill to get up to 450, get all your ingredients in order...mise en place.  This is another really important part because once you get the dough on the grill, you're not gonna have time to walk away and grab everything.


We made two pizzas. It's a little easier to flip a small one then one really big one...and we both like different toppings.   Mine had homemade sauce, which I usually keep on hand in the freezer, homemade pesto made with fresh basil from my garden, plum tomatoes and red onion, both from the garden too! My husband's pizza had chicken, cherry peppers and jalapeno peppers from the garden.

Once you've got everything in place, preferably next to your grill, and the grill is hot and ready, oil up your dough with some olive oil. This is when my husband takes over cooking. The dough has to be totally brushed with oil so there is no chance of it sticking. If you add an excessive amount of oil, it will taste like fried dough, but has the possibility of catching on fire... I'd chance it! We put our dough on a big pizza board with a handle so its really easy to flip and move around. Makes my husband feel like a pro. You can use a wooden cutting board though.  Before you flip your pizza dough onto the grill, make sure it's not stuck to the surface by sliding it around. One of the first times we made grilled pizza, it stuck and folded up on the grill. It was impossible to spread out again. We made the best of it and just ended up with bite size pieces we dipped in sauce and threw toppings on.


When you have successfully flipped it onto the grill, close it for about three minutes. To test if it's done, peek under the dough to look for nice grill marks. It should lift off pretty easily. If it's about done, start brushing it with oil again for the next side to cook.  *Some people choose not to flip their dough and most likely cook it on a lower temp. We've tried that but prefer both sides cooked so you're not left with any raw dough.


As soon as you flip your pizza, start adding your toppings.  We usually end with the cheese so it sandwiches the toppings inside. Close up the grill and let it cook another four or five minutes until the cheese is melted. If you find that your pizza is done but the cheese hasn't melted yet, you can throw it under the broiler in your oven for a few minutes.


Let the pizza sit for a few minutes...if you can wait that long...before you cut it. 


It's seriously the best pizza you will ever make and maybe even eat.


Perfect for summer.  And for your husband to make.


You're Welcome :)

Friday, July 4, 2014

Saved by the Crock Pot

Life has been a little crazy lately between job transitions and a huge project we have going on in our backyard! It's been too long since I've cooked a hearty meal.  Fortunately, it rained the other night, finally, and the market down the street had a huge meat sale so I bought some short ribs.

I've never cooked these before and am usually not a big fan of pork. But anything "rib" related calls out to me. They were on sale for $5.99 a pound an come in chunks with the bone. Sometimes I don't like buying meat like this because I really have no idea how much it will cost. 4 pieces which looked like about 2 servings ended up costing way more than I would have ever spent on meat....almost $15! For one meal, I would rather not spend that much but what the hell, we hadn't eaten something really good in way too long.

From going out to eat a lots of places, I know that short ribs are often "braised." This means combining high and low temperatures to cook a piece of meat. The meat is seared on all sides first then cooked at a lower temp in a liquid for tenderness and moistness. As I usually do when it comes to cooking something new, I look up lots of different recipes. Some called for using Dutch ovens, which I do not own, so I figured the best alternative would be the good ol' crock pot! And of course I didn't have all the ingredients some of the recipes "required" so I improvised and made do with what I had.


Braised Short Ribs
Serves 2

2 lbs short ribs (about 4 pieces)
1 cup red wine I used a Cabernet
1 cup chicken stock  beef would be ideal
1/2 cup celery, chopped
1/4 cup mushroom, chopped
1/4 cup carrots, chopped
4 cloves of garlic, whole
1 tbs tomato paste
1 tbs flour
1 tsp fresh chives
2 tsp scallions, diced
1 tsp fresh parsley
1 tsp oregano
salt and pepper
olive oil

In a large skillet, over medium heat, drizzle about 2 tbs of olive oil. Season short ribs on each side with salt and pepper. Sear short ribs for about 5 minutes on each side then transfer to separate plate.

In the juices leftover, saute the celery, carrots and mushrooms.  Add the tomato paste and flour. Stir well. Add the red wine and bring to a simmer. Add your fresh herbs then the short ribs back to the pan. Simmer for about ten more minutes.


Meanwhile, pour your stock in your crock pot on high heat. Add the whole garlic cloves.

Add all the contents of your skillet to the crock pot. Cover and cook on high heat for one hour then reduce to low heat and cook for another 1 1/2 hours.


Serve over mashed potatoes... and with some bread for soaking up all the incredibly delicious broth left behind in the crock pot. Mmmmmmm, it's amazing!


If possible, use fresh herbs whenever possible. All the original recipes called for onions of which I was out of. But, I did have fresh parsley, chives and red onions growing in my garden. The scallions came from the tops of the onions that were not quite ready to be picked.


While dinner was in the crock pot, I shoveled dirt and put up some fencing....multi-tasking only a woman can do.


You're Welcome

Monday, June 9, 2014

A Well Rubbed Rack...

I used to not eat meat. Buffalo chicken and ribs brought me back to reality and I am forever grateful.  When I normally buy ribs, I buy "country" style which are a little bigger, a little fattier and come in pieces that fit perfectly in my crockpot. However, a whole entire rack of ribs was on sale this week so I decided to give those a chance...the traditional, "fall off the bone," "finger lickin' good" type you'd get in a restuarant.  These did not fit in my crockpot.  So what to do when I'm in need of some culinary advice...go to facebook!

I knew I wanted to barbecue them but the last time I made a huge rack they didn't come out so good. Like didn't fall off the bone. At all. And were super tough and couldn't even be eaten, hence no finger lickin.'  I was told by a few people to boil them first, which I thought was kinda odd.  Usually boiling cooks all the nutrients out of your food and I wasn't too sold on doing that to this lovely rack of ribs. I did it anyways then grilled them.  They were pretty much inedible.  My solution was the "country style" that fit in the crockpot. These come out amazing but it's just not the same experience as digging your ravenous teeth into a huge chunk meat and ripping the succulent pork off the bone like the natural meat eaters we are.

When I'm not totally confident in how to make something, I usually search a ton of recipes and take bits and pieces that I like to make them my own. That's what I magically did with these ribs and they were just about perfect! I adjusted the time in the oven so the meat falls off a bit more.  My husband threw the rub together and massaged it into the ribs and I did the rest. I do have to warn you, unlike most of my other recipes, this one takes several hours to cook...but come out so good they will be gone within minutes.

BBQ Ribs
  • One full rack of ribs
  • 2 tbs paprika
  • 1 tbs garlic powder
  • 1 tbs onion powder
  • 1 tbs chili powder
  • 1 tbs cumin
  • 1 1/2 tsp pepper
  • 1 1/2 tsp salt
  • 1/2 cup chicken stock...beer would probably work good too!
  • Sweet Baby Ray's
  • 2 tbs cornstarch
  • 1tbs water
  • 1/4 cup brown sugar
  • 2 tbs balsamic vinegar
Combine all your spices in a bowl. Rub thoroughly on both sides of the ribs. Put in an oven proof baking dish and cover with saran wrap and tin foil then put in the fridge for about 2 hrs.

Preheat your oven to 200 degrees. Place ribs in. They will need to cook for 3-4 hours. After 2 hours, pour your chicken stock in the pan and coat the ribs with the barbecue sauce.

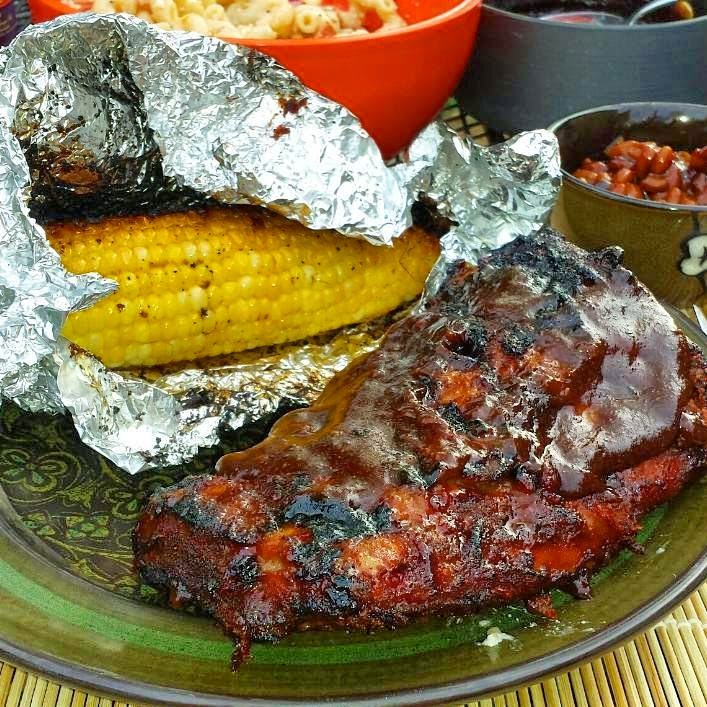
After about 4 hours, place them on the grill over medium high heat. Cook on both sides for about 7 minutes or until it has a char that you like.  Brush with more barbecue sauce if you want!

Now for some dipping sauce. Pour the leftover juices from the baking dish into a small sauce pan. Bring to a boil over medium heat.

In a separate bowl combine the water and cornstarch. This helps it not get lumpy when you add it in.

Lower the temperature to a simmer. Add the brown sugar and vinegar. Whisk in the cornstarch to the sauce. It should thicken within seconds, if not add a little more.

It should be done at the moment your ribs are.


We made grilled corn on the cob too which is my favorite way to eat it. Put a piece of corn, a slab of butter and your favorite spices in a foil package. Grill for about 20 minutes but make sure you move it around in between so it caramelizes evenly.


 You're Welcome

Thursday, June 5, 2014

Last Minute Marsala

Somehow in between baking dozens of cupcakes for a fundraiser this weekend, I managed to make an amazingly delicious and pretty nutritious meal...and squeeze in a power nap. Usually when I have a huge amount of cupcakes to bake, we order out. Being as we are on a budget like most people, I figured I'd just make something quick.

I honestly wasn't expecting this to come out so good considering how quickly I threw it together and didn't really measure so hope my amounts below are accurate. I must have said "wow" at least 10 times when I was eating this, and I never say that about my food. But seriously, wow.  It made me think of the scene in What About Bob when Bill Murray is eating dinner at table with Richard Dreyfuss' family...."Mmmm, mmmmm, mmmm, mmmm....Mmmmm, mmmmm, mmmm, mmmmm. MMMMMMMM!" If you don't' know what I'm referring to, please go watch this movie immediately. My dad introduced us to the best movies.

Baby bella mushrooms were on sale last week so I had some in my fridge. I always have chicken on hand. My husband loves chicken and mushrooms....Chicken Marsala!  I rarely ever make it so that's what I did. The main ingredient in this dish is marsala wine which has it's own unique flavor and hard to substitute. Cooking with wine on a budget?! I bought 16oz bottle of marsala cooking wine by Holland House for a whopping $4.00 at the grocery store. You can find it at the package store for pretty cheap too.  It's an Italian wine, similar to a port wine or dry sherry but is what makes chicken marsala, chicken marsala.  I wouldn't recommend substituting it...just make the trip to the grocery store or package store, it'll be worth it.

You can serve this over cauliflower rice, brown rice or, mashed potatoes would be even better...but all I had was veggie noodles, which worked just as good and maybe a bit healthier.

Chicken Marsala
serves 2-3

  • 2 large chicken breasts
  • 3/4 cup chicken stock
  • 1/2 cup flour (if you wanna make it gluten free, use corn starch)
  • 3/4 cup marsala wine
  • 1 tsp balsamic vinegar
  • 1 cup of sliced mushrooms
  • 1/4 cup diced onion
  • 2 TBS olive oil
  • 2 TBS butter
  • 1 tsp oregano
  • 1 tsp parsley
  • 1/2 tsp garlic powder
  • salt
  • pepper

Pound out your chicken and cut the fat off. Combine oregano, flour, garlic powder, salt and pepper.

Dredge your chicken in the flour lightly on both sides.

In a large skillet, heat olive oil and butter over medium heat.

Cook chicken for about 4 minutes on both sides.  Set aside. I put mine in a casserole dish and in the oven on a super low temperature to keep it warm.

In the same pan, saute your mushrooms and onions. After they cook for about 3 minutes, add your chicken stock, marsala wine and balsamic vinegar. Add parsley and more salt and pepper to taste.

Let simmer for about 8 minutes. There should be enough leftover flour from the chicken to make a nice brown sauce.

Pour this over the chicken and serve. 

We had it with veggie noodles and KALE! I say that with excitement because I haven't eaten kale in over a year. I was eating it religiously for a while and trying new ways to cook it. Finally made some kale chips in the oven with sea salt and I ate them all in one night. Me and kale parted ways later that night as I tossed and turned in bed. I never thought I would eat it again. But it was pretty cheap at the grocery store so I bought some.


We have no more kale now.  Or leftovers.

Tuesday, June 3, 2014

Pineapple Makes Everything Better

I wish I had a pineapple plant in my backyard. Yep, it's a plant. I am obsessed with it. Seriously can't think of one thing that wouldn't taste good if it had pineapple in it. And please never buy it in a can, unless you enjoy metallic, corn syrupy, yellow mush. Sweet, sour, spicy, savory...it can be anything you want.  Grilled, chopped,  sprinkled on anything. My favorite way to eat it is on pizza. With bacon. I ate it pretty much everyday in Hawaii. When I came back, I needed it on everything. I miss Hawaii.
Look for a pineapple that has even coloring


One of my favorite summer salads has pineapple in it. It's not quite summer yet, but I am in the mood for pineapple all the time. You can actually serve this salad with just about anything. Over steak, on top of a piece of fish, as a side dish with some tortilla chips, lettuce wraps or all by itself. And it's just stupid easy to make...

Black Bean Summer Salad
Serves 4-6 people

  • One can of Black Beans...I don't have the patience for soaking them 
  • 1/2 cup of diced red bell pepper (I think I used about 1/2 of a whole pepper)
  • 1/2 cup diced fresh pineapple
  • 1 clove of garlic, minced
  • 1/2 red onion, diced
  • 2 TBS olive oil
  • juice of one whole lime
  • pinch of salt
  • 1/2 of a jalapeno, finely diced
  • 2 TBS fresh cilantro (I made the mistake of buying it dried once because I absolutely love this herb but can never finish a whole bunch and it doesn't freeze well...it was a complete waste because it has no flavor whatsoever. Now I just come up with stuff to make just to use it all up. Not such a bad thing!)
Drain your beans really well. In a large bowl, throw in your beans, onions, peppers, jalapenos and cilantro.  *A good tip to chop your cilantro is to take the back of the knife you just used to mince your garlic and "scrape" off the leaves.  Once you have a good pile, scrunch it all together and chop away.
Combine your olive oil, lime juice, salt and garlic. 

Pour on top of the bean mixture.

You should really let it sit in the refrigerator for a few hours so all the flavors really soak in. I would recommend adding the pinepple shortly before you are ready to serve it. That way the pineapple stays nice and firm and juicy.

Enjoy because it won't last very long!
 

You're Welcome.