Showing posts with label homemade. Show all posts

Tuesday, October 28, 2014

Homemade Apple Fritters

Every year since I can remember, I've gone to the Apple Festival. People don't go there for the rides or the crafts. They go for the apple fritters. I'm sure I've spent hours waiting for these things, which I honestly don't mind at all since they are after all, the best apple fritters. Ever. These people got it down to a science, and a really well organized assembly line.  The result is a perfectly round, warm, sugar coated, toasty-on-the-outside, soft and moist on the inside, melt-in-your-mouth, ball of diced apple and cinnamony sweet dough.


Yep. It's definitely worth waiting for.  One year, my husband and I got THE last batch of fritters, after waiting hours in line of course. We walked away clutching our white, greased stained paper bags in our arms like it was a million dollars, then devoured half of them in the way back to the car. You really should eat these right away. If not, they lose their nice crispy outside.

This year, I missed it. Sigh. But, I did go apple picking. And was having guests over for dinner. Though lucky for me, I didn't actually have to make dinner. My sister, who went to culinary school, came over on an extremely rare occasion and cooked us an amazing dinner that I cannot do justice by describing with words. She grills a mean steak. So I knew I'd have plenty of time to make fritters and guests to eat them.
Filet with Gorganzola Cream Sauce and Sauteed Portobello Mushrooms served with a Side of Fingerling Potatoes and Roasted Brussel Sprouts


Apple Fritters                              

adapted from Seemingly Greek
Makes about a dozen
  • 1 heaping cup of flour
  • 1 tsp vanilla
  • 1 egg
  • 1/3 cup milk
  • oil for frying (I use canola)
  • 3 apples, diced should come out to about a cup
  • cinnamon and sugar mixture for coating
  • 1 tsp baking powder
  • 1/2 cup sugar
  • 1/4 tsp allspice
  • 1 1/2 tsp cinnamon

Combine your dry ingredients, minus the extra cinnamon/sugar. Fold in your apples. This tends to help them stay in place.

Combine your milk, egg and vanilla. Carefully add to your flour/apple mixture.

In a medium sized pot over medium heat, pour enough oil so it come up about 3 inches. Heat up to 365 degrees.  If you don't have a thermometer to gauge this, just test it out with a tiny amount of batter. When it's hot enough, it will sizzle instantly.

When the oil is ready, use a mini cookie dough scoop to plop the batter into the oil. If you don't have one, a tablespoon should work good too.

Be careful not to over fill your oil so the fritters have enough room to cook.  They may need to be "flipped" while they fry using a slotted spoon.

Once they are nicely golden brown, transfer them to a paper towel lined plate to absorbs any excess grease.


Right away roll them in your cinnamon and sugar mixture. You can probably use a big ziploc bag for this too or a deep baking dish.

Serve warm or with a piece of chocolate cheesecake after an amazingly delicious meal your sister just cooked. I mean that's what I did....


No need to wait in line anymore.

You're Welcome.

Wednesday, October 1, 2014

A Perfect Rainy Day Dinner

Summer has ended...sigh...but I still have tons of tomatoes from my garden and pureed in my freezer. I usually make sauce with them. But even Italians can get sick of homemade sauce so I needed to change it up a bit.

Of course, I ended up making a whole big pot of sauce. We usually make pizza or chicken parm when there's fresh sauce. Been there, done that way too many times lately.  I was in need of something new. I searched through my cabinets and found myself in the liquor cabinet staring at a huuuuge bottle of vodka. Like ginormous. Someone gave it to us a a gift last year...it was that big that it was still unfinished. Bloody Mary's are my favorite so I  always have vodka on hand.

There it was...vodka sauce. What goes better together than tomato and vodka?! It would not come from a jar or from a restaurant. Super easy to make with an already homemade batch of fabulous sauce.

I searched lots of recipes as I usually do the first time I make something. Most of them use crushed tomatoes instead of sauce. Finally found a few, one by my arch nemesis Giada DeLaurentis, which I will admit I was inspired by. She's just a bit too over the top for me, with her forced Italian accent and unnecessarily elaborate cooking methods. She's way too skinny to seriously eat her own food! Anyways, I created my own recipe...


Vodka Sauce

Makes 4 servings

  • 3-4 cups of homemade sauce...or one jar of your favorite sauce would do 
  • 3/4 cup of vodka
  • 1/2 cup of heavy cream, room temp
  • 5 slices cooked bacon
  • 1/3 cup of grated cheese..I used Romano
  • Red pepper flakes
  • Garlic Powder
  • One pound of pasta
In a saucepan over medium low heat, combine your sauce and vodka. Simmer for about 25 minutes in order to cook all the alcohol out. Stir frequently.

Meanwhile, cook your bacon. Chop into coarse pieces.

Taste the sauce after 25 minutes to make sure it doesn't taste too strongly of vodka...unless you wanna get a bit of a buzz from your dinner.

Slowly add your cream and whisk thoroughly.  Add the grated cheese, garlic powder and red pepper flakes.

Using an immersion blender, puree the sauce til smooth. Lower the heat and simmer for another 10 minutes.


The sauce should be somewhat thick and creamy. And pink!  Then add your bacon.

Serve over your favorite pasta! 


Perfect rainy day meal.


You're Welcome.


Monday, August 11, 2014

The Perfect Pizza

I can't tell you how many times I cooked pizza before I finally found the best way to make it...on the grill.  We don't make it any other way. The grill is the only way and it comes out amazing and done in less than ten minutes. I do have to warn you that it is not easy and might take a few tries to get it down perfectly. We've been grilling pizza for a few years now but still screw it up every once in a while...mostly due to my lack of patience for waiting for the dough to rise. 


I usually start with making my own dough. My husband scolded me one time we messed up the pizza blaming it one the store bought dough.  Homemade dough just tastes better and has a little bit more elasticity...that is if you let it rise completely.

Pizza Dough Recipe 

Makes 1 large pizza about 14" or two 8" pizzas

Combine about 2 1/2 cups of flour, a tablespoon of sugar, sprinkle of salt and a teaspoon of garlic powder in a bowl. I say approximate measurements especially with the flour because you'll be using more when you go to stretch it out.

**Super important next step... get one cup of water to a temperature of 120 degrees.  You definitely need a thermometer for this. If it's too hot the yeast will die and result in your dough not rising at all. If it's not hot enough, the yeast won't activate and make your dough nice and stretchy either.  Once you have the perfect temp, dump in your yeast and whisk until it's dissolved.

I drizzle a tablespoon or two of oil olive into the yeast water. Pour that into your flour mixture and dig in. Hands are the best tools for this. When everything is incorporated, dump your dough out and knead for at least 8 minutes...another super important step! I'm so used to baking where you combine ingredients until they are just mixed so for a while I wasn't kneading enough. My dough would come out flat, dense and chewy.

Not the waiting begins. Even if you buy dough at the store, you still have to wait.  I make my dough first thing in the morning and leave it out on the counter, oiled up, always tightly covered and under a towel all day. Or if it's a sunny day, I put it outside.  It should take a few hours. The perfect temperature for dough to rise is 82 degrees.  The dough should just about double in size by the time it's ready.

Here's a good link to describe and show how to properly stretch your dough...

Some tips for stretching dough:
  • Don't play with it too much. If you overwork your dough, it'll pretty much get tired and not wanna work anymore
  • If you're using a wooden board, place a moist towel underneath it so it doesn't slide all around.
  • Use enough flour so it's not sticky but not too much so it dries it out.
  • Try to make it even thickness, about 1/2 inch.
  • Small holes can be fixed with a little pinching


Fire up the grill...

While you wait for your grill to get up to 450, get all your ingredients in order...mise en place.  This is another really important part because once you get the dough on the grill, you're not gonna have time to walk away and grab everything.


We made two pizzas. It's a little easier to flip a small one then one really big one...and we both like different toppings.   Mine had homemade sauce, which I usually keep on hand in the freezer, homemade pesto made with fresh basil from my garden, plum tomatoes and red onion, both from the garden too! My husband's pizza had chicken, cherry peppers and jalapeno peppers from the garden.

Once you've got everything in place, preferably next to your grill, and the grill is hot and ready, oil up your dough with some olive oil. This is when my husband takes over cooking. The dough has to be totally brushed with oil so there is no chance of it sticking. If you add an excessive amount of oil, it will taste like fried dough, but has the possibility of catching on fire... I'd chance it! We put our dough on a big pizza board with a handle so its really easy to flip and move around. Makes my husband feel like a pro. You can use a wooden cutting board though.  Before you flip your pizza dough onto the grill, make sure it's not stuck to the surface by sliding it around. One of the first times we made grilled pizza, it stuck and folded up on the grill. It was impossible to spread out again. We made the best of it and just ended up with bite size pieces we dipped in sauce and threw toppings on.


When you have successfully flipped it onto the grill, close it for about three minutes. To test if it's done, peek under the dough to look for nice grill marks. It should lift off pretty easily. If it's about done, start brushing it with oil again for the next side to cook.  *Some people choose not to flip their dough and most likely cook it on a lower temp. We've tried that but prefer both sides cooked so you're not left with any raw dough.


As soon as you flip your pizza, start adding your toppings.  We usually end with the cheese so it sandwiches the toppings inside. Close up the grill and let it cook another four or five minutes until the cheese is melted. If you find that your pizza is done but the cheese hasn't melted yet, you can throw it under the broiler in your oven for a few minutes.


Let the pizza sit for a few minutes...if you can wait that long...before you cut it. 


It's seriously the best pizza you will ever make and maybe even eat.


Perfect for summer.  And for your husband to make.


You're Welcome :)

Monday, June 9, 2014

A Well Rubbed Rack...

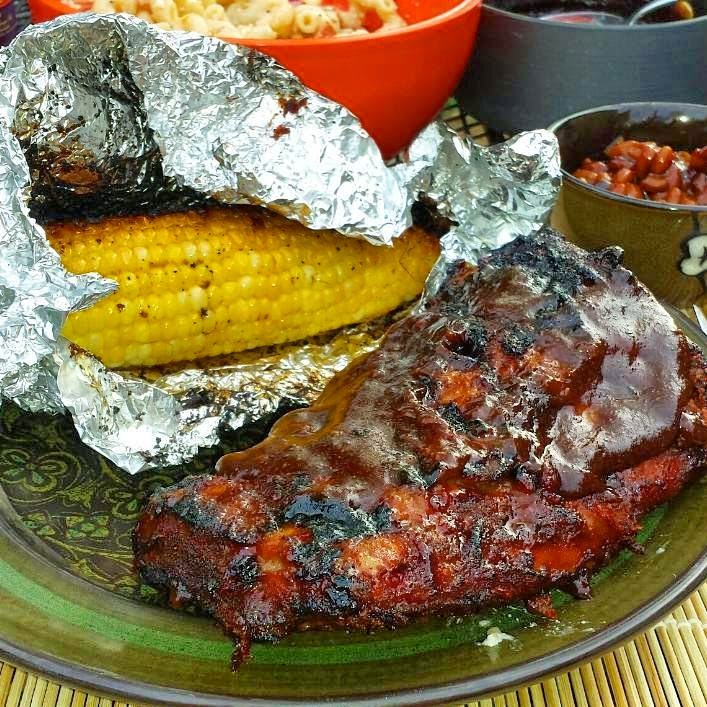
I used to not eat meat. Buffalo chicken and ribs brought me back to reality and I am forever grateful.  When I normally buy ribs, I buy "country" style which are a little bigger, a little fattier and come in pieces that fit perfectly in my crockpot. However, a whole entire rack of ribs was on sale this week so I decided to give those a chance...the traditional, "fall off the bone," "finger lickin' good" type you'd get in a restuarant.  These did not fit in my crockpot.  So what to do when I'm in need of some culinary advice...go to facebook!

I knew I wanted to barbecue them but the last time I made a huge rack they didn't come out so good. Like didn't fall off the bone. At all. And were super tough and couldn't even be eaten, hence no finger lickin.'  I was told by a few people to boil them first, which I thought was kinda odd.  Usually boiling cooks all the nutrients out of your food and I wasn't too sold on doing that to this lovely rack of ribs. I did it anyways then grilled them.  They were pretty much inedible.  My solution was the "country style" that fit in the crockpot. These come out amazing but it's just not the same experience as digging your ravenous teeth into a huge chunk meat and ripping the succulent pork off the bone like the natural meat eaters we are.

When I'm not totally confident in how to make something, I usually search a ton of recipes and take bits and pieces that I like to make them my own. That's what I magically did with these ribs and they were just about perfect! I adjusted the time in the oven so the meat falls off a bit more.  My husband threw the rub together and massaged it into the ribs and I did the rest. I do have to warn you, unlike most of my other recipes, this one takes several hours to cook...but come out so good they will be gone within minutes.

BBQ Ribs
  • One full rack of ribs
  • 2 tbs paprika
  • 1 tbs garlic powder
  • 1 tbs onion powder
  • 1 tbs chili powder
  • 1 tbs cumin
  • 1 1/2 tsp pepper
  • 1 1/2 tsp salt
  • 1/2 cup chicken stock...beer would probably work good too!
  • Sweet Baby Ray's
  • 2 tbs cornstarch
  • 1tbs water
  • 1/4 cup brown sugar
  • 2 tbs balsamic vinegar
Combine all your spices in a bowl. Rub thoroughly on both sides of the ribs. Put in an oven proof baking dish and cover with saran wrap and tin foil then put in the fridge for about 2 hrs.

Preheat your oven to 200 degrees. Place ribs in. They will need to cook for 3-4 hours. After 2 hours, pour your chicken stock in the pan and coat the ribs with the barbecue sauce.

After about 4 hours, place them on the grill over medium high heat. Cook on both sides for about 7 minutes or until it has a char that you like.  Brush with more barbecue sauce if you want!

Now for some dipping sauce. Pour the leftover juices from the baking dish into a small sauce pan. Bring to a boil over medium heat.

In a separate bowl combine the water and cornstarch. This helps it not get lumpy when you add it in.

Lower the temperature to a simmer. Add the brown sugar and vinegar. Whisk in the cornstarch to the sauce. It should thicken within seconds, if not add a little more.

It should be done at the moment your ribs are.


We made grilled corn on the cob too which is my favorite way to eat it. Put a piece of corn, a slab of butter and your favorite spices in a foil package. Grill for about 20 minutes but make sure you move it around in between so it caramelizes evenly.


 You're Welcome

Thursday, February 27, 2014

Save the 'Nanas!

I went grocery shopping the last weekend. On a Sunday. Around noon. Worst. Time. Ever.  Normally, I would ask my husband to come with me but knowing what madness lie ahead, I decided it wasn't the best idea. He likes to wander aimlessly through the aisles with me tossing the hand held scanner as high as he can in the air...not as productive as I need him to be sometimes ;)

I know exactly what I need and have repeated the list in my head over and over so I can navigate through the store as quickly as I can.  I find whatever spot I can, grab my bags and rush inside ready for battle. Produce is always the first stop. Bananas. I need bananas. The only fruit I can get my husband to eat because you can put peanut butter on it. And chocolate...and sprinkles.

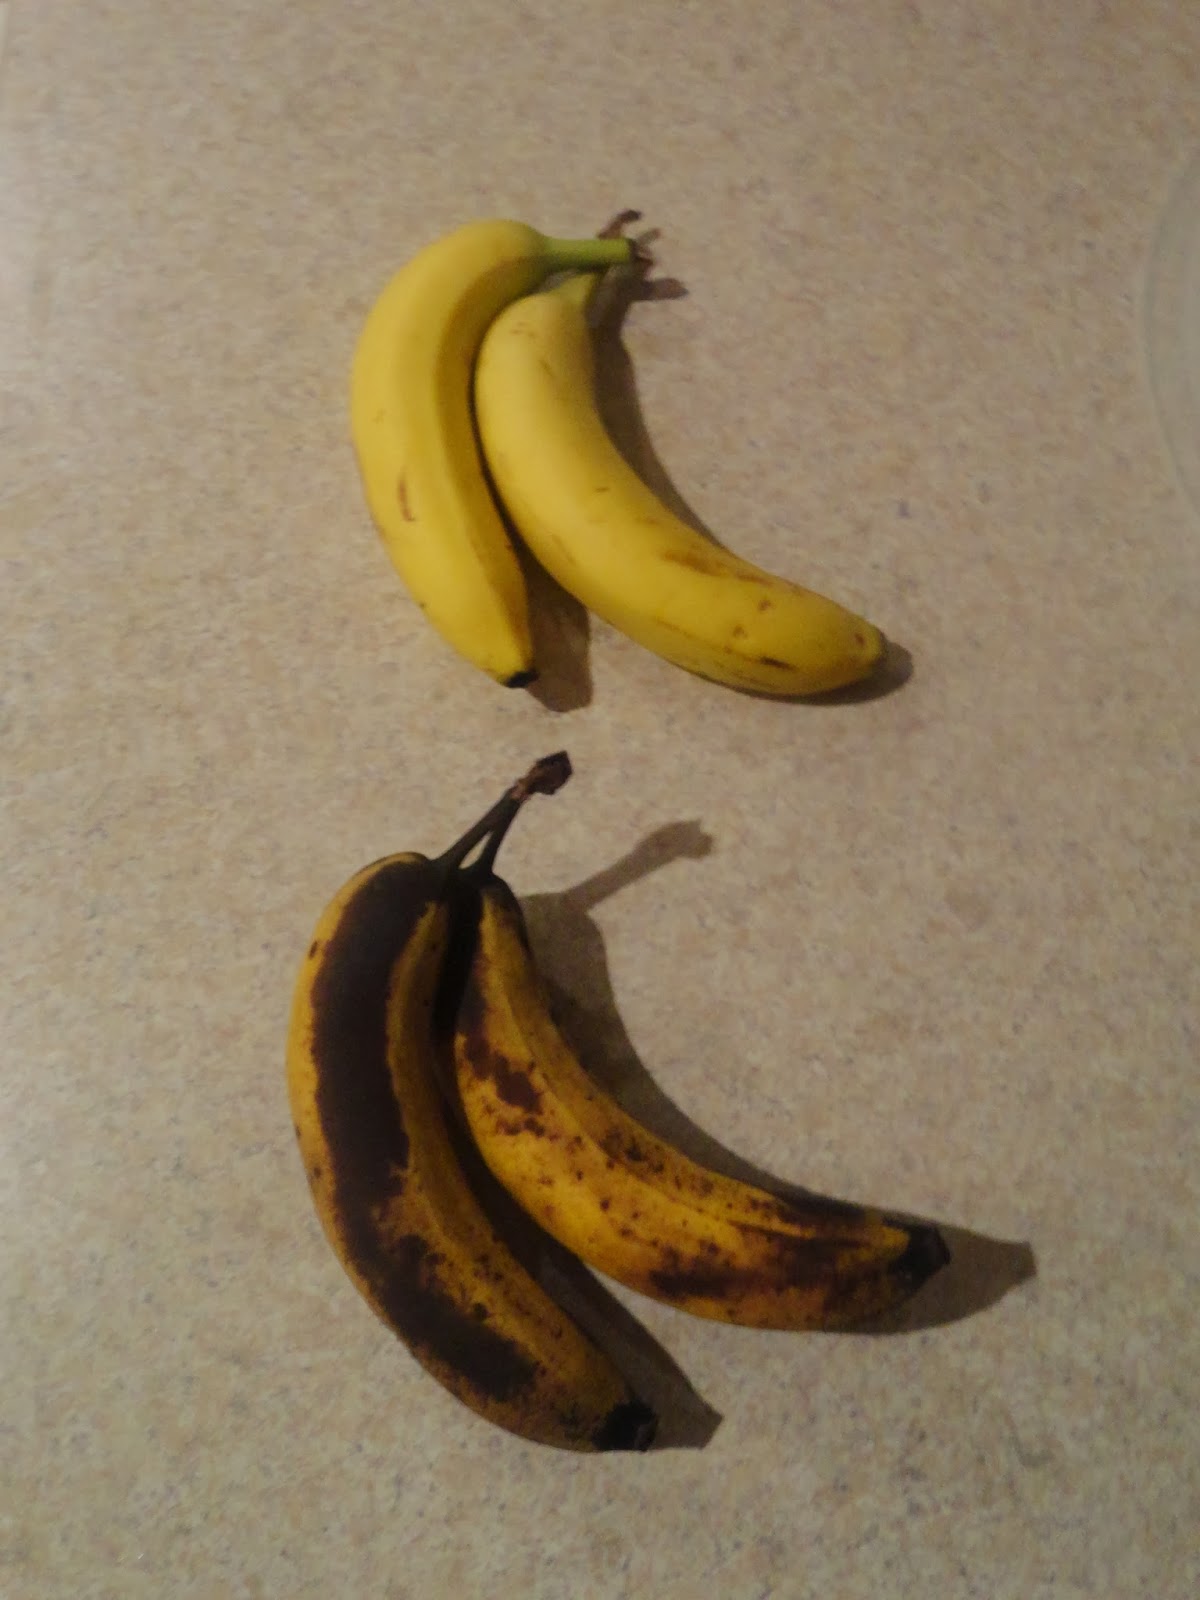
Of course I go the store after the mad rush of people and there's hardly any left and the ones that are, are all bright green.  I buy them anyways since, eventually they will ripen and turn yellow. Right?  Four days later, they are mostly dark brown. Never turned the slightest shade of yellow...just brown. But, I do not throw them away.  Most people would immediately put them in the garbage but I see it as baking opportunity.

Yellow is for eating. Black is for baking. :) 

I say the darker the better. When it comes to baking with bananas, they should be overripe. Yes, those ugly bananas with their black spots and all make THE perfect banana flavor to bake with.  First thought was to make the Banana Cake with cream cheese frosting covered in toasted pecans that I made for Thanksgiving.  I have no cream cheese and this cake MUST be made with cream cheese frosting just cuz it tastes so good.  Next...banana muffins.  I never eat breakfast and my husband is constantly running around at work so doesn't have time to eat. Banana muffins will be perfect and last through the week.


Banana Muffins
Makes 12 regular sized muffins 
or 36 minis
adapted from Ms. Betty C

1 3/4 cup flour
1/2 cup sugar
2 tps baking powder
1 tsp baking soda
2-3 overripe bananas, mashed
1/4 vegetable oil
3/4 milk
1 egg
1 tsp vanilla extract
*add nuts if you want

 Preheat oven to 350. Fill your baking pans with paper liners.

Combine flour, sugar, baking powder, and baking soda in a mixing bowl.

Combine oil and milk in a measuring cup. (*tip 1/4 + 3/4= 1 cup of liquid. no need for separate measuring cups!)  Add the vanilla and egg.  Whisk until incorporated. Add mashed banana. 

Pour liquid ingredients into dry ingredients. Stir until just combined. DO NOT OVER MIX YOUR MUFFINS! *often over mixing a batter will result in a dense and dry product...like a brick.

Scoop into liners 2/3 of the way. I topped mine with a little cinnamon and sugar, which I keep already mixed in a container in my baking cabinet. Bake until the edges are just golden brown. Did I mention I never use timers either...unless it's brownies. I always screw up baking brownies.
 

These muffins rise so nicely and came out just moist enough. The original recipe had WAY less sugar which is why I upped it to 1/2 cup but that still may not be sweet enough for your taste buds. It wasn't for my husband, but he still ate them.  If you like a sweet muffin like from the store, you may want to add more sugar probably about 1 cup.
 
If you don't eat all your muffins, give them away... Sharing is caring! Or you can throw them in the freezer and take them out as you want to eat them. On the subject if freezing...unfortunately, ready to bake bananas do not work well frozen. I mashed some up once and put them in a container in the freezer hoping I could use them the following week, but they turned all black and gross. Fail. 

So save your 'nanas! Banana Bread! Banana Muffins! Banana Pancakes! Banana Shakes!

You can also make Blueberry Muffins...
Omit the bananas. Add 1 pint of fresh blueberries, replace vanilla with fresh lemon juice, add 2 tsp of finely chopped lemon rind. 

Or add Crumble Topping...
1/3 cup brown sugar, 2 TBS flour, 1 tsp cinnamon, 4 TBS butter. Use a pastry blender or a fork to combine all ingredients until crumbly. Sprinkle on muffins before baking.