Friday, July 4, 2014

Saved by the Crock Pot

Life has been a little crazy lately between job transitions and a huge project we have going on in our backyard! It's been too long since I've cooked a hearty meal.  Fortunately, it rained the other night, finally, and the market down the street had a huge meat sale so I bought some short ribs.

I've never cooked these before and am usually not a big fan of pork. But anything "rib" related calls out to me. They were on sale for $5.99 a pound an come in chunks with the bone. Sometimes I don't like buying meat like this because I really have no idea how much it will cost. 4 pieces which looked like about 2 servings ended up costing way more than I would have ever spent on meat....almost $15! For one meal, I would rather not spend that much but what the hell, we hadn't eaten something really good in way too long.

From going out to eat a lots of places, I know that short ribs are often "braised." This means combining high and low temperatures to cook a piece of meat. The meat is seared on all sides first then cooked at a lower temp in a liquid for tenderness and moistness. As I usually do when it comes to cooking something new, I look up lots of different recipes. Some called for using Dutch ovens, which I do not own, so I figured the best alternative would be the good ol' crock pot! And of course I didn't have all the ingredients some of the recipes "required" so I improvised and made do with what I had.


Braised Short Ribs
Serves 2

2 lbs short ribs (about 4 pieces)
1 cup red wine I used a Cabernet
1 cup chicken stock  beef would be ideal
1/2 cup celery, chopped
1/4 cup mushroom, chopped
1/4 cup carrots, chopped
4 cloves of garlic, whole
1 tbs tomato paste
1 tbs flour
1 tsp fresh chives
2 tsp scallions, diced
1 tsp fresh parsley
1 tsp oregano
salt and pepper
olive oil

In a large skillet, over medium heat, drizzle about 2 tbs of olive oil. Season short ribs on each side with salt and pepper. Sear short ribs for about 5 minutes on each side then transfer to separate plate.

In the juices leftover, saute the celery, carrots and mushrooms.  Add the tomato paste and flour. Stir well. Add the red wine and bring to a simmer. Add your fresh herbs then the short ribs back to the pan. Simmer for about ten more minutes.


Meanwhile, pour your stock in your crock pot on high heat. Add the whole garlic cloves.

Add all the contents of your skillet to the crock pot. Cover and cook on high heat for one hour then reduce to low heat and cook for another 1 1/2 hours.


Serve over mashed potatoes... and with some bread for soaking up all the incredibly delicious broth left behind in the crock pot. Mmmmmmm, it's amazing!


If possible, use fresh herbs whenever possible. All the original recipes called for onions of which I was out of. But, I did have fresh parsley, chives and red onions growing in my garden. The scallions came from the tops of the onions that were not quite ready to be picked.


While dinner was in the crock pot, I shoveled dirt and put up some fencing....multi-tasking only a woman can do.


You're Welcome

Monday, June 9, 2014

A Well Rubbed Rack...

I used to not eat meat. Buffalo chicken and ribs brought me back to reality and I am forever grateful.  When I normally buy ribs, I buy "country" style which are a little bigger, a little fattier and come in pieces that fit perfectly in my crockpot. However, a whole entire rack of ribs was on sale this week so I decided to give those a chance...the traditional, "fall off the bone," "finger lickin' good" type you'd get in a restuarant.  These did not fit in my crockpot.  So what to do when I'm in need of some culinary advice...go to facebook!

I knew I wanted to barbecue them but the last time I made a huge rack they didn't come out so good. Like didn't fall off the bone. At all. And were super tough and couldn't even be eaten, hence no finger lickin.'  I was told by a few people to boil them first, which I thought was kinda odd.  Usually boiling cooks all the nutrients out of your food and I wasn't too sold on doing that to this lovely rack of ribs. I did it anyways then grilled them.  They were pretty much inedible.  My solution was the "country style" that fit in the crockpot. These come out amazing but it's just not the same experience as digging your ravenous teeth into a huge chunk meat and ripping the succulent pork off the bone like the natural meat eaters we are.

When I'm not totally confident in how to make something, I usually search a ton of recipes and take bits and pieces that I like to make them my own. That's what I magically did with these ribs and they were just about perfect! I adjusted the time in the oven so the meat falls off a bit more.  My husband threw the rub together and massaged it into the ribs and I did the rest. I do have to warn you, unlike most of my other recipes, this one takes several hours to cook...but come out so good they will be gone within minutes.

BBQ Ribs
  • One full rack of ribs
  • 2 tbs paprika
  • 1 tbs garlic powder
  • 1 tbs onion powder
  • 1 tbs chili powder
  • 1 tbs cumin
  • 1 1/2 tsp pepper
  • 1 1/2 tsp salt
  • 1/2 cup chicken stock...beer would probably work good too!
  • Sweet Baby Ray's
  • 2 tbs cornstarch
  • 1tbs water
  • 1/4 cup brown sugar
  • 2 tbs balsamic vinegar
Combine all your spices in a bowl. Rub thoroughly on both sides of the ribs. Put in an oven proof baking dish and cover with saran wrap and tin foil then put in the fridge for about 2 hrs.

Preheat your oven to 200 degrees. Place ribs in. They will need to cook for 3-4 hours. After 2 hours, pour your chicken stock in the pan and coat the ribs with the barbecue sauce.

After about 4 hours, place them on the grill over medium high heat. Cook on both sides for about 7 minutes or until it has a char that you like.  Brush with more barbecue sauce if you want!

Now for some dipping sauce. Pour the leftover juices from the baking dish into a small sauce pan. Bring to a boil over medium heat.

In a separate bowl combine the water and cornstarch. This helps it not get lumpy when you add it in.

Lower the temperature to a simmer. Add the brown sugar and vinegar. Whisk in the cornstarch to the sauce. It should thicken within seconds, if not add a little more.

It should be done at the moment your ribs are.


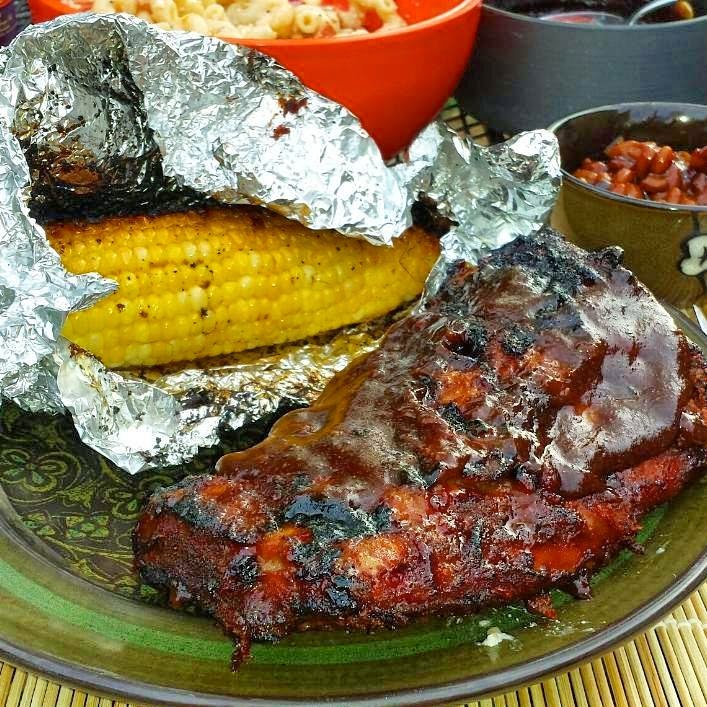
We made grilled corn on the cob too which is my favorite way to eat it. Put a piece of corn, a slab of butter and your favorite spices in a foil package. Grill for about 20 minutes but make sure you move it around in between so it caramelizes evenly.


 You're Welcome

Thursday, June 5, 2014

Last Minute Marsala

Somehow in between baking dozens of cupcakes for a fundraiser this weekend, I managed to make an amazingly delicious and pretty nutritious meal...and squeeze in a power nap. Usually when I have a huge amount of cupcakes to bake, we order out. Being as we are on a budget like most people, I figured I'd just make something quick.

I honestly wasn't expecting this to come out so good considering how quickly I threw it together and didn't really measure so hope my amounts below are accurate. I must have said "wow" at least 10 times when I was eating this, and I never say that about my food. But seriously, wow.  It made me think of the scene in What About Bob when Bill Murray is eating dinner at table with Richard Dreyfuss' family...."Mmmm, mmmmm, mmmm, mmmm....Mmmmm, mmmmm, mmmm, mmmmm. MMMMMMMM!" If you don't' know what I'm referring to, please go watch this movie immediately. My dad introduced us to the best movies.

Baby bella mushrooms were on sale last week so I had some in my fridge. I always have chicken on hand. My husband loves chicken and mushrooms....Chicken Marsala!  I rarely ever make it so that's what I did. The main ingredient in this dish is marsala wine which has it's own unique flavor and hard to substitute. Cooking with wine on a budget?! I bought 16oz bottle of marsala cooking wine by Holland House for a whopping $4.00 at the grocery store. You can find it at the package store for pretty cheap too.  It's an Italian wine, similar to a port wine or dry sherry but is what makes chicken marsala, chicken marsala.  I wouldn't recommend substituting it...just make the trip to the grocery store or package store, it'll be worth it.

You can serve this over cauliflower rice, brown rice or, mashed potatoes would be even better...but all I had was veggie noodles, which worked just as good and maybe a bit healthier.

Chicken Marsala
serves 2-3

  • 2 large chicken breasts
  • 3/4 cup chicken stock
  • 1/2 cup flour (if you wanna make it gluten free, use corn starch)
  • 3/4 cup marsala wine
  • 1 tsp balsamic vinegar
  • 1 cup of sliced mushrooms
  • 1/4 cup diced onion
  • 2 TBS olive oil
  • 2 TBS butter
  • 1 tsp oregano
  • 1 tsp parsley
  • 1/2 tsp garlic powder
  • salt
  • pepper

Pound out your chicken and cut the fat off. Combine oregano, flour, garlic powder, salt and pepper.

Dredge your chicken in the flour lightly on both sides.

In a large skillet, heat olive oil and butter over medium heat.

Cook chicken for about 4 minutes on both sides.  Set aside. I put mine in a casserole dish and in the oven on a super low temperature to keep it warm.

In the same pan, saute your mushrooms and onions. After they cook for about 3 minutes, add your chicken stock, marsala wine and balsamic vinegar. Add parsley and more salt and pepper to taste.

Let simmer for about 8 minutes. There should be enough leftover flour from the chicken to make a nice brown sauce.

Pour this over the chicken and serve. 

We had it with veggie noodles and KALE! I say that with excitement because I haven't eaten kale in over a year. I was eating it religiously for a while and trying new ways to cook it. Finally made some kale chips in the oven with sea salt and I ate them all in one night. Me and kale parted ways later that night as I tossed and turned in bed. I never thought I would eat it again. But it was pretty cheap at the grocery store so I bought some.


We have no more kale now.  Or leftovers.

Tuesday, June 3, 2014

Pineapple Makes Everything Better

I wish I had a pineapple plant in my backyard. Yep, it's a plant. I am obsessed with it. Seriously can't think of one thing that wouldn't taste good if it had pineapple in it. And please never buy it in a can, unless you enjoy metallic, corn syrupy, yellow mush. Sweet, sour, spicy, savory...it can be anything you want.  Grilled, chopped,  sprinkled on anything. My favorite way to eat it is on pizza. With bacon. I ate it pretty much everyday in Hawaii. When I came back, I needed it on everything. I miss Hawaii.
Look for a pineapple that has even coloring


One of my favorite summer salads has pineapple in it. It's not quite summer yet, but I am in the mood for pineapple all the time. You can actually serve this salad with just about anything. Over steak, on top of a piece of fish, as a side dish with some tortilla chips, lettuce wraps or all by itself. And it's just stupid easy to make...

Black Bean Summer Salad
Serves 4-6 people

  • One can of Black Beans...I don't have the patience for soaking them 
  • 1/2 cup of diced red bell pepper (I think I used about 1/2 of a whole pepper)
  • 1/2 cup diced fresh pineapple
  • 1 clove of garlic, minced
  • 1/2 red onion, diced
  • 2 TBS olive oil
  • juice of one whole lime
  • pinch of salt
  • 1/2 of a jalapeno, finely diced
  • 2 TBS fresh cilantro (I made the mistake of buying it dried once because I absolutely love this herb but can never finish a whole bunch and it doesn't freeze well...it was a complete waste because it has no flavor whatsoever. Now I just come up with stuff to make just to use it all up. Not such a bad thing!)
Drain your beans really well. In a large bowl, throw in your beans, onions, peppers, jalapenos and cilantro.  *A good tip to chop your cilantro is to take the back of the knife you just used to mince your garlic and "scrape" off the leaves.  Once you have a good pile, scrunch it all together and chop away.
Combine your olive oil, lime juice, salt and garlic. 

Pour on top of the bean mixture.

You should really let it sit in the refrigerator for a few hours so all the flavors really soak in. I would recommend adding the pinepple shortly before you are ready to serve it. That way the pineapple stays nice and firm and juicy.

Enjoy because it won't last very long!
 

You're Welcome.

Friday, May 30, 2014

Thank you, Lobster

In my family, a birthday isn't just one day, it's an entire week. For my husband's birthday, I made him a few extra special dinners and treats. This had to include lobster. Before he met me, my husband never had lobster. He never ate sushi, homemade soup or even peanut butter and jelly. Not because my mother-in-law didn't cook but because he was perfectly content living on cheeseburgers, hot dogs and egg sandwiches. He definitely married the right woman ;) So I introduced him to my all time favorite messy, savory, fresh food to eat...lobster.

When I think about lobster, it brings back great memories from being a kid and going on family vacations to Rhode Island. Every summer, my mom would pack up her 1980 brown Volvo station wagon, manual mind you, with us five kids. Who the hell can possibly drive standard with five kids in the car?!?  My step dad would follow with his old Chevy truck, loaded with five bikes and endless amount of beach toys. It was tradition to take a ride to Point Judith and pick out lobsters. I remember being the only one of us kids that got excited for this. I'd get to go look in the huge tanks, not like the ones you see in the supermarket. These were wide open on the floor and there were hundreds of fresh lobsters ready to be boiled, ripped apart and doused in warm butter.  When we got home with out lobsters, it was also tradition for my step dad to "play" with them first and scare the crap out of my little brothers. He'd stick them in the kiddie pool with them, no elastic bands around their claws.

When it was time to eat and the water was boiling, I always left the kitchen because I couldn't watch them die. As quick as my mom could drop them in, they were bright red and fully cooked. If you've never cooked your own lobster, it's really super easy and fast. Just don't let the guilt get to you and say "thank you."

I have to give my step dad credit for teaching me how to eat a lobster and how to drive stick.  My husband says I only like it because it's really messy and I am an incredibly messy eater. So what?!  It's the only food where it's accepted and encouraged to get messy and use your hands. I mean they give you a plastic bib when you eat it in restaurants! Definitely something I would enjoy.

So I cooked us some lobsters for dinner the other day. Going out for lobster dinner would have cost at least $40 per plate and you don't get to see them ahead of time or know where they came from.  I bought our's at Stew Leonard's for just under $20, for both of em. 


So of course this is the only picture I took realizing after I was done eating, it would make a good blog post. I was too excited to think about taking pictures. Plus, my hands were covered in butter.

Tips for cooking and eating lobster:

A good size lobster should be about 1 1/4 pounds.  Anything closer to 2 pounds is going to be tough and not have as much flavor. If you get one that's one pound, you're gonna wish you had more. I could have probably stepped up my game to a pound and a half.

Buy your lobster a few hours before you plan on eating it. You can stick it in the fridge until your ready to cook it.

A lobster should be boiled 8-10 minutes per pound. I boiled 1 1/4 pound lobster for 9 minutes and it was perfect.  It will be bright red. I run it under cold water right after I removed it to stop the cooking process and cool it off. Since we had two lobsters, I used two large pots so they were ready at the same time. Don't try to fit them both in the same pot. You could cook one at a time but the first one may not be hot by the time the water reboils and cooks the other one for an additional 8-10 minutes.

If you feel guilty about boiling it there's a few things you can do to ease the pain, your's and the lobster's.  Supposedly, you can put it in the freezer for a few minutes before hand. It makes the lobster feel a little "sleepy."  Or you can stab it in the head. Yes, it sounds awful but if you take a sharp butcher knife and pierce it through the back of the lobster's head, this kills it quickly. Immediately put it in the pot of water afterwards, if you have the guts to do it. I know I couldn't. 

I just wanted to get it over with as quickly as possible. As soon as I got home I put the lobsters in the fridge, never opening the bag. Once the water was boiled, I took out the lobster, cut off the elastic bands on the claws, dropped it in the pot head first and put the lid on. I set the timer and didn't look back until it went off. Done.

Make sure you have the right tools to open up the lobster. You need a nut cracker for sure and a tiny three pronged fork. We had neither of these. The only hard part is the claws. If you have the tools I mentioned, you'll be eating in no time. So we had to "make-do. "Using the back of a butcher knife, I cracked the claw on a cutting board. I also had a fondue fork which actually worked great. It's perfect for reaching inside the knuckles. You can even suck out meat from all it's tiny little legs. But the best part, as my mouth waters, is the tail...the meatiest, most delectable part of the lobster.  To get to this, rip apart the tail from the rest of the body. Discard the upper part of the body once you've removed the claws because there's nothing really in there.  You can use a knife to carefully cut vertically down the under side of the tail, but I usually just use my man hands and break it open.  My husband likes to use two fingers or a thumb and push out the meat from one end. It comes out in one huge piece.

Melt plenty of butter before hand. I put a stick of real butter, not margarine or any other fake crap, in a small sauce pan on low while the lobsters were cooking.  Oooh and I added a squeeze of lemon to the butter too.

Have a large bowl on the table to collect the juices and shell.  This is messy! I break apart my lobster over the big bowl because you may have some suprises inside. Eggs or leftover lobster poop may be something you find.  If you see bright red or orange pieces inside the tail, just take them out or eat em! They are eggs that haven't been released yet but some people think they're pretty tasty.  If you see a greenish substance, just rinse it off or leave it and eat it too!

I served my lobsters with Garlicky Roasted Green Beans and Twice Baked and Loaded Potatoes. Dessert was Strawberry Shortcake with homemade sweet biscuits and fresh whipped cream. 


Here's a link to some photos of someone painstakingly waiting to eat their lobster in order to get each shot of what I described above.  It's alot of work but that's the fun of eating it and there's no one there to stare at you while you eat with a silly plastic bib tied around your neck. And it beats paying close to $100 for lobster dinner for two.


Seriously, don't forget your bib. And napkins. Lots of em.


You're Welcome.


Wednesday, May 28, 2014

Chinese...No Take out Necesary

I have a love/hate relationship with Chinese food. I love love love to eat it. I hate the feeling after I've only been able to finish half of my container full of General Tso's Chicken and remain planted on the couch the remainder of the night. I love opening the fridge the next day, knowing my leftovers are there so I can eat the rest... and feel like shit all over again.  My solution was to make Thai food. Check out my Coconut Curry Chicken. My last bout with that didn't go so well considering I had to throw away an entire dinner due to overcooked rice noodles. I'm a rule breaker and extremely impatient so this is the result of cutting corners. I'm slowly learning my lesson. I tried to salvage it by adding my freshly cooked veggies and peanut sauce. We couldn't get past the slurpy gooey texture. This one went in the garbage.

This week is my husband's birthday so I figured I'd make him something he really loves to eat.  I don't believe he ever had Chinese food before he met me. I had him eat it once...he was hooked. I found a recipe from i heart naptime. Why didn't I name my blog that?!  Naptime is my favorite. I've made this recipe before and it came out awesome. We will probably never order Chinese again...unless I really want an eggroll which would go perfectly with this, and only partially make me feel like crap. I had to alter it due to our addiction to any and all things spicy. I'm not really even sure what to call this. It's sweet, sour, spicy and salty and super easy!

Sweet 'n Sour n' Spicy Sesame Chicken
Serves 4

  • Two large chicken breasts
  • 2 tbs cornstarch
  • 2 eggs, whisked
  • 1/2 cup ketchup
  • some squirts of Siracha
  • 1 tbs of rice vinegar
  • 1 tbs soy sauce
  • dash of red pepper flakes
  • 1 clove of garlic, minced
  • 1/2 tsp garlic powder
  • 1/2 tsp onion powder
  • 1/2 tsp sesame seeds
  • 1/3 cup brown sugar
  • 1/4 tsp cayenne pepper
  • oil for frying

Cut up your chicken into small pieces, about the size of a half dollar.  In a bowl, toss your chicken, garlic powder, onion powder, cayenne pepper and cornstarch.


Heat up a small amount of oil in a pan, about 1/4 inch. I used vegetable but sesame would be awesome.

Preheat your oven to 350.

In a separate bowl, whisk your eggs. When the oil is hot enough, coat your chicken in the egg then drop carefully in the pan. Cook for about 3 minutes on each side. You are only frying them quickly just to get a crunchy outside. They will finish up in the oven. Have a pan ready with a paper towel on it to soak up an excess grease. I worked in batches.


When your chicken is done frying, put it on a foil lined pan and bake for about 20 minutes. Meanwhile, make your sauce.
 
In a bowl, combine ketchup, soy sauce, rice vinegar, Siracha, sesame seeds, red pepper flakes, minced garlic and brown sugar. This sounded so unbelievably gross to me the first time I read this because I hate ketchup, but it does work really well. I would love to try it with chili sauce though.

After the chicken has been in the oven for about 20 minutes, take it out and toss with your sauce. Throw it back in the oven for about another 15 minutes while you cook your rice and veggies.
I serve over brown rice and broccoli.


Tomorrow I will open my fridge and eat my leftovers and my stomach will feel happy.


You're Welcome.

Monday, May 12, 2014

A Mother's Day Miracle...

So unfortunately, I have barely any pictures to go along with this post. I swear I should just have a camera recording in my kitchen at all times. I make lots and lots of meals, usually in a matter of minutes, scarf it down thinking how good it tastes then realize... wow, that was delicious, other people need to eat this... then Shit! I didn't take any pictures! 

I do have a legitimate excuse for this because I was cooking for non other than... my in-laws. I was a bit of a crazy person that morning and didn't even have a chance to drink a Bloody Mary, my all time favorite any time of day drink.  But I did cook a bangin' ass breakfast after drinking about 5 cups of coffee.

There was seven of us total and everything came out excellent, on time and most importantly hot! We all sat at a set table complete with flowers and vintage floral table cloth napkins freshly purchased from XOVintage. Right next to the baby chickens, which are currently renting a space in our dining room while they await the construction of their beautiful new coop!  But anyways, it was a miracle to get all of us together, for more than an hour to sit down to a homemade meal, not purchased or made by the guest of honor, my mother-in-law.


~The Menu~

Nutella and Brie &
Peach Preserves and Brie
Breakfast Croissants

Scrambled Eggs and Cheese

Slow Cooker French Toast 

Homemade Waffles with Fresh Blueberry Sauce

Buffalo Home Fries

Bacon and Sausage

Lemon Meringue Cupcakes

Chocolate Mousse Cupcakes


In addition, my brother in law made some mini quiches in wonton wrappers which were really yummy and my mother-in-law brought fresh strawberries and made creamy marshmallow dip and Eclair Cake. Yep, we're Italian.


Breakfast Croissants:
Makes 16
  • One container of Pillsbury Crescent Rolls
  • Whatever filling your little heart desires...in this case, it was a schmear of Nutella and a dollop of Brie in one batch and a scoop of Peach Preserves and Brie in the other

I prepped these the night before so I was able to just pop em in the oven the next day. 

Preheat oven to 350. Line a pan with parchment paper for easy cleanup. 
Assemble croissants and give it your best attempt to make it look like they do on the package. But don't worry, because they probably won't!

Bake for about 10 minutes or until lightly golden brown. They might ooze out a little but it's just more dipping for your croissant! Serve immediately.


Slow Cooker French Toast:
Serves about ten


  • One loaf of any old bread. Yes, literally any old bread. I prefer a heartier bread that can handle soaking up all the eggs and milk. I  go to the "day old" baked goods section of the grocery store.
  • 8 eggs
  • 2 1/2 cups of milk
  • Half a stick of butter
  • 1 Tbs cinnamon
  • 2 Tbs vanilla
  • 1/4 brown sugar
The night before you plan to serve this, spray your beloved crock pot with some cooking oil. I forgot to do this step so my pot will be soaking for the next few days or even weeks.  

Layer your bread in the crock pot.  

Combine the eggs, milk, cinnamon, vanilla and brown sugar in a mixing bowl. Add the brown sugar.

Pour over the bread. Use your hands to make sure all the bread is soaked. Cut up your stick of butter into chunks and throw it in too.

Cook all night on low temp. Don't cook more than 7 hours or it may burn, depending on your crock pot. If you have one with a timer, I'm jealous.

Serve warm with real maple syrup. Any maybe some more brown sugar.


Homemade Waffles with Blueberry Sauce
Makes about 10-12 waffles

  • 1 3/4 cup flour
  • 2 Tbs sugar
  • 1 Tbs baking powder
  • 2 eggs
  • 1 3/4 cup milk
  • 1/2 cup vegetable oil
  • 1 tsp vanilla
I prepped the dry ingredients the night before so all I had to do was add the wet in the morning...and ask my mother in law to bring more eggs because we used the rest.

Combine the flour, sugar and baking powder in a bowl. 

In a separate bowl, combine your milk, eggs, vanilla and oil. Add this to the flour mixture.

You know the rest. I am assuming you know how to use your waffle iron.

Blueberry Sauce:
In a small saucepan, cook about a pint of blueberries over medium heat. Add about 3 teaspoons of sugar. When the blueberries start to break down and there is a good amount of liquid, add 1/2 teaspoon of cornstarch.  Should take about 8-10 minutes. If it seems to be too thick, you can a tiny bit of water. Keep stirring until it is the consistency you want.

Serve on waffles and/or eat out of the bowl.

Buffalo Home Fries:    
Already blogged! Ooooh a photo!

Lemon Meringue Cupcakes:
Makes 12
For Cupcakes...
  • 1/2 cup cake flour
  • 1/2 cup King Arthur's unbleached All Purpose Flour
  • 1 tsp baking powder
  • 1/2 tsp baking soda
  • 1 tsp lemon zest
  • 2 eggs
  • 3/4 cup of sugar
  • 1 1/2 tsp real lemon extract 
  • 1/2 cup oil
  • 1/2 cup buttermilk (or 1 tsp vinegar, fill up to 1/2 cup with milk)
Preheat oven to 360. Yes, this sounds strange but for my oven it works perfectly! 

In a medium bowl, combine flours, baking soda, baking powder and lemon zest. 

In a stand mixer, beat the eggs. Add the sugar then oil. Add lemon extract. 

On a slow speed, alternate adding the flour mixture and buttermilk. I always scrape the bottom of the bowl to make sure everything has been incorporated. 

Fill cupcake liners 2/3 of the way and bake for about 18 minutes or until edges are just turning golden brown. Set aside to cool.

For Filling...

Make a package of lemon pudding pie filling according to directions on the box. I would never normally use this if I were selling these but I knew for certain it would taste good. It's the way my Noni does lemon meringue pie and I made the cupcakes for her. And I had no time to experiment and play around.  The in-laws were coming...

For Meringue Topping...

This was also on the box of the lemon pie pudding filling!  Over a double boiler on low heat, beat three room temperature egg whites and 1/4 cup of sugar. Add 1/4 tsp cream of tartar. I use my emulsion blender attachment for this.

Beat for about 10 minutes and egg whites are white and frothy. I also add this to my Kitchen Aide mixer with the whisk attachment for extra fluffiness.

Assembly...

Cut out the centers of your cooled cupcakes with a smooth edged sharp knife. Kinda like a cone shape. Fill your cupcake with about a teaspoon of lemon filling.  Use a star tip and pastry bag to pipe on your frosting. Then whip out your blow torch and make a toasty top.


Chocolate Mousse Cupcakes:
Makes 12

For the Cupcakes...

  • 1 cup flour
  • 2 eggs
  • 1/2 cup cocoa powder
  • 6 Tbs butter
  • 1/2 tsp baking soda
  • 1/2 tsp baking power
  • 1 cup sugar
  • 1 tsp vanilla
  • 3/4 cup milk
Preheat oven to 350.

Using the stand mixer, cream the butter and sugar together.

In a separate bowl, combine your flour, baking powder, baking soda and cocoa powder.

Add your eggs and vanilla to the creamed butter and sugar. Scrape the bowls to make sure everything is incorporated.

Slowly add you flour mixture and milk alternating each one at a time.

Beat until ingredients are just blended.

Fill cupcake liners 2/3 of the way. I always use my ice cream scooper. 

Bake about 18 minutes or until a toothpick comes out clean.

For the Filling...
Whip about 1/2 cup of heavy whipping cream in a mixer until thick and smooth. Put in fridge for later.
In a microwave safe bowl, melt 4 oz of semi sweet chocolate chips and about 2 tsp of heavy cream. 
Let cool about 5 minutes. Add a heaping spoonful of whipped cream to the chocolate and gently stir. Add the remainder of the whipped cream and fold carefully into the chocolate. Refrigerate until ready to use.

For the Frosting...
Follow the directions on the back of the Hershey's Cocoa Powder box. Seriously, it's the best chocolate frosting ever.  Melt a stick of butter. Add 2/3 cup of cocoa powder and stir. Dump in a mixing bowl and add about 3 cups of powdered sugar, one cup at a time, along with 1/4 cup of milk. You may need to adjust according to the consistency you want.

Assembly...
Cut out the middle of the cupcake with a smooth sharp knife. Pop the middle in your mouth. Use a spoon or pastry bag to fill the cupcakes with the mousse. Use a fancier tip and pastry bag to frost. top with a raspberry. Indulge.


You're Welcome.